

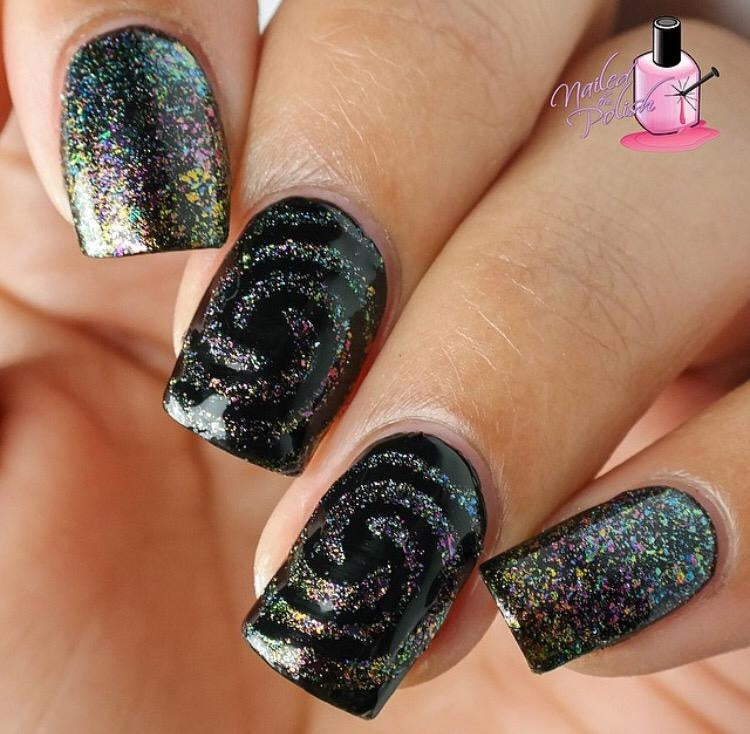
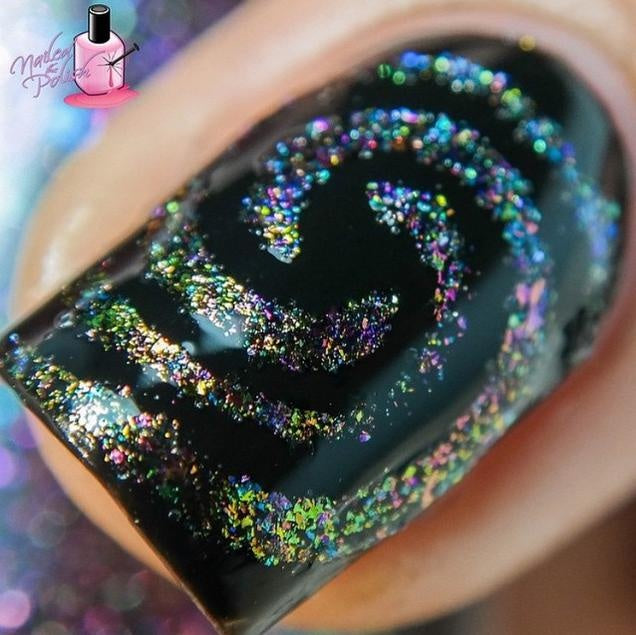
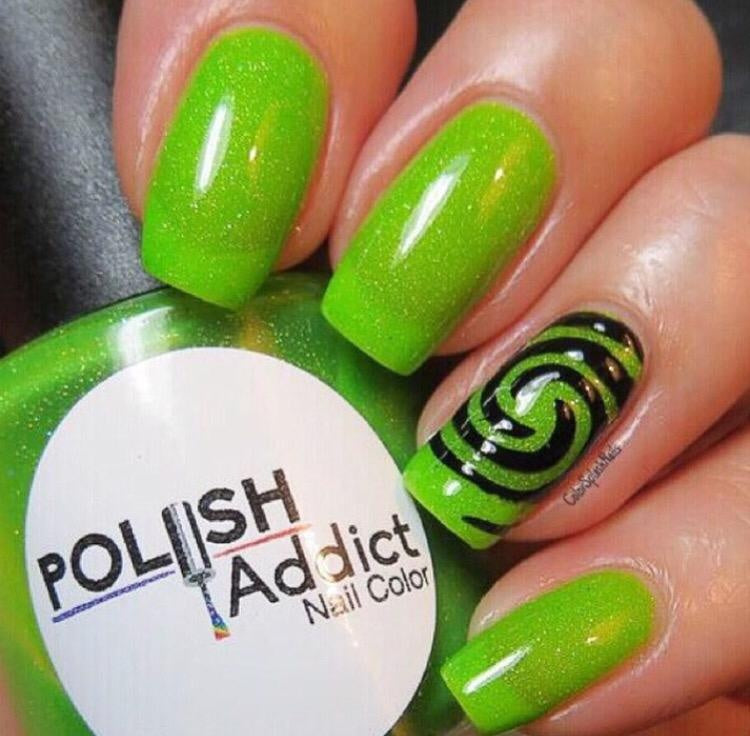


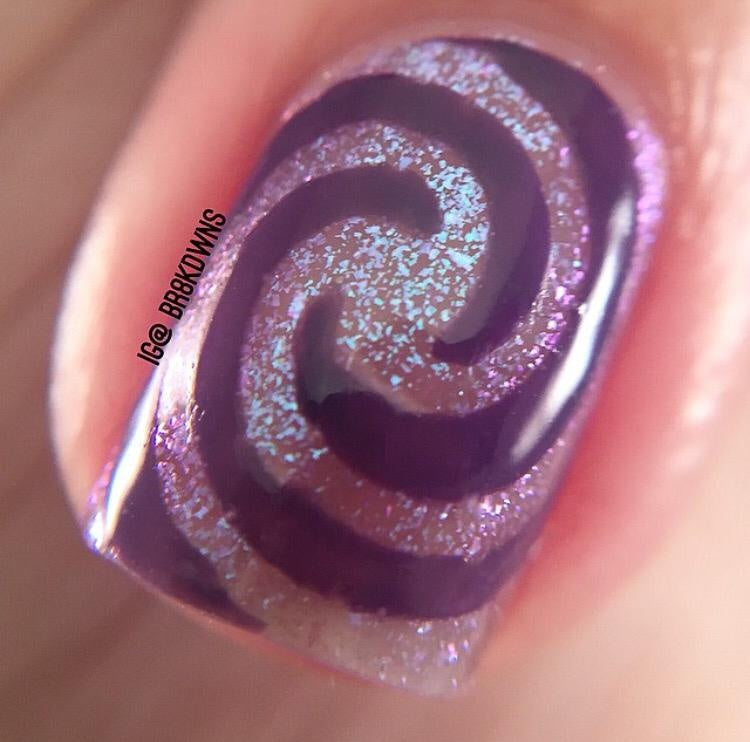

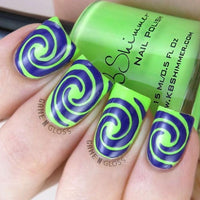
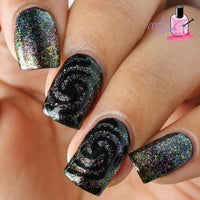
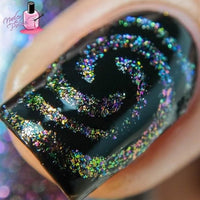
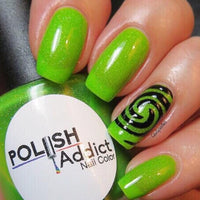

Whirlpool Stencils
Directions
2. Once thoroughly dried, paint a coat of clear, fast-drying topcoat onto your nails.
3. Once thoroughly dried, use tweezers to lift nail vinyl off its sheet and place onto your nail.
4. Apply your second choice of polish over the nail vinyl.
5. While the nail polish is still wet, remove your nail vinyl from your nail.
6. Add a topcoat and show off your gorgeous new manicure!
Tips
- Tips and tricks for using nail vinyls can be found here.
- Use tweezers to lift your vinyls. The oils of hands will remove the sticky residue from the vinyl.
- Remove the nail vinyl while the polish is still wet. Once the polish begins to dry, it will create a stringy and clumpy effect of polish when removing the vinyl.
Let customers speak for us

I love this so much! I got the trio and everything has their own spot. I’ve been having really bad eczema that caused my thumb to crack from the dryness. After one oil soak, I saw a HUGE difference. Now, after 3 soaks, it’s healed!
AMAZING. Smells great, great price, great all around.
🍯
I ran to this website after I saw how much it helped the owner’s sister with her dry hands! I have chronically dry knuckles/cuticles, no matter how much body oil/lotion I use. I could tell a difference after literally one night. I woke up and my hands were baby soft and my manicure looked better than the day I got it. Highly recommend! And if this came in a full size to be used as a body oil, I’d be the first customer.
I love this cuticle oil! It makes my cuticles feel so moisturized. It absorbs fast and doesn’t get everywhere and make your fingers greasy like some other nail oils. Will definitely be buying again!
I love all of the bottles and would definitely want the refill bottle

Definitely enjoying the promotion that allowed me to create my own bundle. The pink gold shift polish is more of a gold to slight pink shift. The product is thick, as stated in the description. Thus making fingertips very hot in the curing process. Overall, I’m enjoying Trying a brand different than my usual brand .

My absolute favorite!! It’s the perfect shade of nude that’ll look good with all skin tones. I will definitely keep buying more soon!

The color is so beautiful and the pigment is amazing! I’m barely starting to do my own gelx nails and I started my gel collection buying gelbaby. I definitely recommend!!

Truly exquisite products. Polish is opaque and sticks well to your nail and doesn’t smear. The stamper is to die for! Trying game changing

Awesome. Will be buying more for Twinkled T Thanks Again
this is everything claimed and more. the best nail oil i’ve ever used, not greasy and soaks in quickly and well. i’m going to be a long time customer of this product from now on!
Works phenomenally❤️

Super cute!
Okay, so my whole life I have struggled with my nails. I bit them for as long as I can remember and finally moved to just biting my cuticles when I was anxious when I was in my late teens (still working on that though--promise this is relevant). I got this in the mail and started using it frequently throughout the day, the paper that came with the bundle (such a good deal btw) said to apply it every time I washed my hands.
That was a week ago and not only have my nails started to grow, they have strengthed SO. MUCH. They were literally paper thin, would flex down to my fingertip (they're short), and were constantly chipped or essentially peeled off in layers from the tip of my nail. Now, the breaks in my nails on the tips where it was peeling have COMPLETELY STOPPED.
I'm in shock to be honest because the solution for me was so simple. If I need some quick but quiet, the small dropper bottle is PERFECT. If I need some just on the go while I'm out the pen makes it mess-free and super convenient. I need the big brush bottle next to my bed and use it every time I wash my hands going to the bathroom. It's thick but spreadable so you don't need to use much at all.
In her TikToks, she says she never has to press down on the dropper to complete both hands, and I'm here to tell you that's true. I did both my hands and had extra to put on the top of my hand too (which I've gotten comments from my boyfriend about how much softer my hands are so it's a great moisturizer for your hands in general).
As a girlie who has struggled to like her nails her whole life, this has changed my relationship with them entirely. To go back to biting my cuticles, I usually have lots of cuts around my cuticles. Not only does this nail oil not hurt them when I put it on (literally completely pain-free) it HEALS THE CUTS IN A FEW DAYS. I'm used to them being there for WEEKS and now they're gone in a matter of days.
I was skeptical of all the claims that were made about this, I just figured any nail oil would help and it was cheap. This is the best $15 I have ever spent on my nail care and there's so much oil in the bundle and you can replace individuals as you need which is such a wonderful system.
Please get this nail oil so she keeps making it, I can't live without it anymore. I am very passionate about this hence all the caps in my review (I swear I'm not a bot or paid to do this, just a broke college student who needed a cheap nail oil bc her nails were in the trenches). This is a great products and I will continue to hype it up because I am obsessed.
If I can update with a picture later, I definitely will or I'll just leave another review titled update after the end of the month.